Many of our customers were facing difficulties to resolve the Deceptive Site Ahead warning issue on their website.
This article is provided as a courtesy to our customers, to help them to resolve the Deceptive Site Ahead warning issue on their website. Hope you will find it helpful.
First, let's know the facts and then we will discuss the procedures to resolve the issue.
What Deceptive Site Ahead Warning & why does it appear?
Deceptive Site Ahead, warning message appears for a website when the web browsers find/assume that the website is infected with malware or a threat which is dangerous for the user to access. It processes the web site as an enormous chance of a data breach or cyber-attack.
The warning might appear for any of the following reasons:
- The website carries malware or threat files
- SSL Certificate not installed properly for the site
- Fore HTTPS redirection not enabled for the site
- There is some Mixed Content (https & https) on the site
When your website has any of the mentioned reasons, then you will get the Deceptive Site Ahead, warning like this:

Now, let's solve the issue.
Step 1 :
Let us know about your issue via ticket and request a malware scan for your site.
We will perform a scan for your mentioned site and clean the malware from the site and then will inform you about it on the ticket. We always make sure that all of our client's sites have SSL enabled. So, most of the time there won't be any issue regarding wrongly installed SSL certificates. But, still, there is a problem like this, you can let us know about it via ticket.
And for the force HTTPS redirection issue and mixed content issue, you have to take help from your website developer. After the successful completion of the required tasks (malware scan, SSL certificate installation check, enable force https redirection & fix the mixed contents from the website) you will have to proceed to the next step (Step 2).
Step 2 :
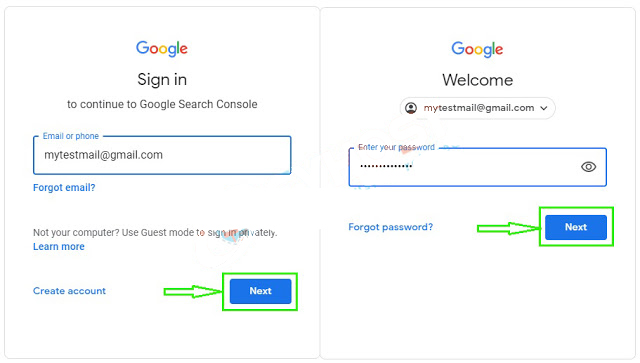
Visit Google Search Console with the following link:
https://search.google.com/search-console?hl=en and then click on the Start now button.

Step 3 :
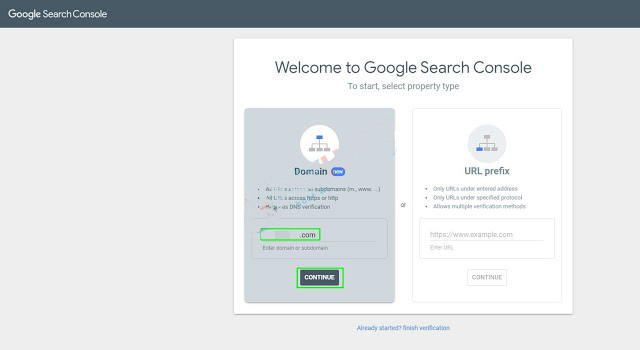
Input your affected domain name in the required field (highlighted in the screenshot), then click on the Continue button.
Step 4 :
For domain ownership verification, you will be asked to add a TXT record on your domain.
Click on the copy button to copy the record. and don't close this browser tab, you have to get back to this browser tab again.
Now you have to proceed to add. the TXT record in your domain. [In the next step we will show, how to add the record from cPanel & Cloudflare]
Step 5.1 : [Add TXT record from cPanel]
Open a new tab in your web browser and then log in to your cPanel and click on the Zone Editor option.
Step 5.2 :
From the next page, click on the Manage button right beside on your domain name ( highlighted in the screenshot)
Step 5.3 :
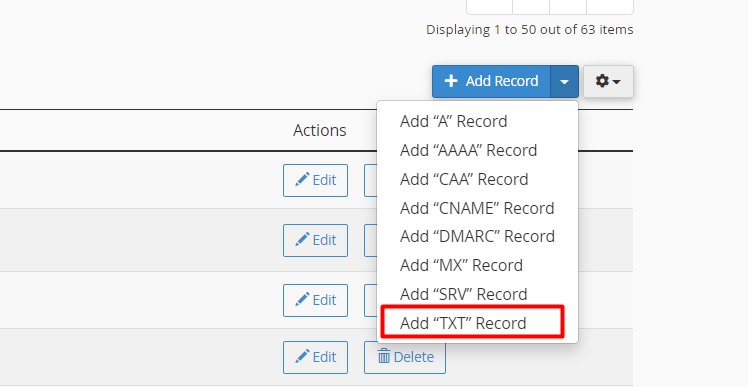
From the next page, click on the Add Record drop-down, then click on the Add TXT Record button (highlighted in the screenshot)
Step 5.4 :
From the next page, in the Record field paste the copied TXT Record as mentioned in the previous step (Step 4), then click on the ADD RECORD button (highlighted in the screenshot).
Step 5.5 : [Add TXT record from CloudFlare]
If you are using Cloudflare, then you have to add the TXT Record from the Cloudflare.
To add the TXT record please log into your Cloudflare account using this link https://dash.cloudflare.com/login
Then, if you have multiple sites added in your Cloudflare dashboard, click on that specific domain for which you want to add the TXT record.
Step 5.6 :
In the next page, click on the DNS tab, then click on the +Add record button
Step 5.7 :
Then from the Type drop-down, select TXT
Then in the Name field write @, keep the TTL as Auto and then in the Content field, paste the copied TXT Record as mentioned in the previous step (Step 4), then click on the Save button (highlighted in the screenshot).
Step 6 :
After the TXT record update, please wait at least 3 hours, sometimes it takes 24 - 48 hours to propagate the newly added DNS record.
Then go to the previous tab (Google Webmaster Tool) of your browser, then click on the Verify button.
Step 7 :
Yet, if the added TXT hasn't propagated properly, then you will get an error like this:
Then you have to wait a little bit.
Step 8 :
After some time you have to repeat process described in Step 6.
Once the added TXT been propagated properly, then you will get a success message like this:
Click on the GO TO PROPERTY button
Step 9:
Step 10:
From the next page's Overview, click on the OPEN REPORT button (highlighted in the screenshot)
Step 11:
In the next page, click on the OPEN REPORT button (highlighted in the screenshot)
Step 12:
A new pop-up window will appear,
Put a tick mark (if required) in the All issues were fixed option. Then in the What was done to fix the issues? Text input section, write all the steps you have taken to resolve the issue, then request Google to remove your site from their Deceptive Site listings. Then click on the SUBMIT REQUEST button.
Now, you have to wait till google responded to your request via e-mail. It will take some time (Sometimes it takes 7 days to 31 days). This depends on Google's responds after reviewing your request.
Step 13:
After Google reviewed your request and cross-check with the current status of the website (if they are satisfied with your request with explanation), they will inform you via mail about your site's de-listing from the Deceptive Site listings.
After a few hours of receiving the mail, your site will be whitelisted from the Deceptive Site listings.
Congratulations!


